Như các bạn đã biết Blogger hỗ trợ hiển thị thống kê cho blog bằng tiện ích Thống kê truy cập nhưng mặc định chỉ hiển thị số lượng truy cập toàn thời gian và hiển thị cũng không được đẹp mắt.
Hôm nay mình có ghé qua blog của một số bạn bè của mình thì có một số mẫu tiện ích thống kê rất đẹp. Bài này SangBlog.Com sẽ hướng dẫn các bạn có thể tạo được nó một cách nhanh chóng và dễ dàng.
Đầu tiên các bạn vào Bố cục - thêm tiện ích mới tùy vị trí bạn muốn nó hiển thị nhé. Chọn thêm tiện ích Thống kê Blog chọn style đầu tiên đặt tiêu đề cho tiện ích là gì tùy bạn VD: Thống kê truy cập, Thông tin Blog, Thống kê Blog
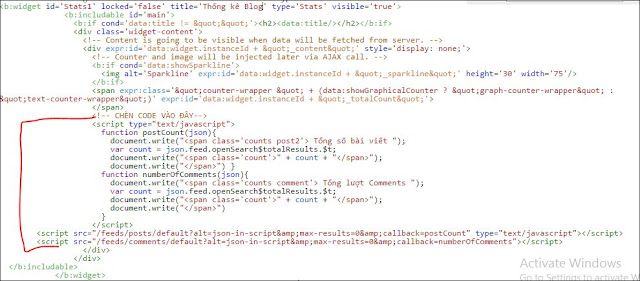
Tiếp theo chuyển qua mục Mẫu chọn Chỉnh sửa html tìm đến tiện ích vừa thêm đó là Stats1
<script type="text/javascript">
function postCount(json){
document.write("<span class='counts post2'> Tổng số bài viết ");
var count = json.feed.openSearch$totalResults.$t;
document.write("<span class='count'>" + count + "</span>");
document.write("</span>")
}
function numberOfComments(json){
document.write("<span class='counts comment'> Tổng lượt Comments ");
var count = json.feed.openSearch$totalResults.$t;
document.write("<span class='count'>" + count + "</span>");
document.write("</span>")
}
</script>
<script src="/feeds/posts/default?alt=json-in-script&max-results=0&callback=postCount" type="text/javascript"></script>
<script src="/feeds/comments/default?alt=json-in-script&max-results=0&callback=numberOfComments"></script>Bước cuối cùng trang trí cho tiện ích thống kê blog style cho đẹp mắt cái này tùy các bạn nhé dưới đây là một style mẫu của mình các bạn chèn nó ngay trước thẻ </head> nhé
<style type='text/css'>
/* Blogger Custom Stats widget*/
.Stats img {display:none!important;background-image:none;}
.Stats .counter-wrapper {width:92%;text-align:right;margin:10px;line-height:35px;color:#4E69A2;font-weight:700;font-size:16px;margin-left: 0;}
.Stats .counter-wrapper:after {content:"Page View ";float:left;text-align:left;font-size:20px;font-weight:700;color:#4E69A2;}
.counts {display:inline-block;width:92%;font-size:20px;line-height:35px;color:#4E69A2;font-weight:700;text-shadow: 4px 4px 10px #4E69A2}
.counts .count {display:inline-block;font-size:24px;height:30px;
vertical-align:top;direction:ltr;float:right;color:#4E69A2;font-weight:700!important;}
.counts:hover .titles:before {color:#333!important;border-radius:2px;border-color:rgba(255,255,255,0.1);}
.counter-wrapper.text-counter-wrapper:before, .counts:before {display:inline-block;font-size:13px;font-family:FontAwesome;font-style:normal;font-weight:normal;margin:0 10px 0 10px;float:left;width:10px;text-align:center;}
.counter-wrapper.text-counter-wrapper:before, .counts:before {
display:block;background-color:#fff;color:#28AE5F;width:35px;height:35px;font-size:18px;line-height:35px;border-radius:2px;margin:0px 8px 0 0;}
.counter-wrapper.text-counter-wrapper:before {content:"\f06e";}
.counts.post2:before {content:"\f044";}
.counts.comment:before {content:"\f0e6";}
#Stats1_content {width:auto;height:auto;background-color:#fff;}
</style>Chúc các bạn thành công. Nếu có thắc mắc đừng ngần ngại comment hoặc inbox cho mình nhé.


